Showing posts with label Kid Friendly. Show all posts

Wednesday, May 13, 2015

Quick Fix Paneer Makhni (Restaurant Style)

Quick Fix Paneer Makhni


This is one of those recipes that I absolutely love! Want to know why? Its because it is not only delicious but can be made quick. Just need a couple of ingredients that generally are my pantry essentials and you’re good to go! Its no surprise that this is one of the top selling dishes at restaurants because its so great and even kids just love it. 

Makhan in Hindi means butter, this gravy is buttery, smooth and delicious that just melts in your mouth literally! Its basically a tomato based gravy with paneer in it. You can also use this gravy as a base for Vegetable Makhni but more on that later! This makes a great dish for a potluck dinner too! You can make it in bulk, just double or even triple the recipe! Plus its perfect for busy weeknights after a long hard work day!

Ingredients


Tomato Sauce
1 can,
Paneer
200 g
Salt
To taste
Red chilly powder
1 tsp
Ginger Garlic Paste
1 Tbsp
Butter
3 Tbsp
Garam Masala Powder
1 tsp
Coriander Powder
1 tsp
Turmeric Powder
¼ tsp
Cumin Seeds
1 tsp
Green chillies
2, Julienne
Ginger
1 inch piece, Julienne
Kasoori Methi
1 tsp
Honey
1 Tbsp
Heavy cream
2 Tbsp/ ¼  cup
Whole Garam Masala
3 cloves, I bay leaf, 3 green cardamom pods


Method


Heat a pan and add some butter in it. Keep the flame low and add in the cumin seeds once the butter starts melting. Add the Whole garam Masala once the cumin seeds start crackling.


Add the ginger garlic paste now. Cook it until the raw smell goes away. Add the full can of tomato sauce. Now add salt, turmeric powder, red chilly powder and coriander powder. Add in less salt as the sauce already has some salt in it.


Add some water and dissolve the spice powders in it and let it cook in medium flame covered. Keep a watch and stir it occasionally. Once the oil oozes out from the sides, the mix would have cooked well with all the spices.


Add the kasoori methi leaves. Crush them with your palm to start getting the flavor out of them. Also add the garam masala powder and honey now. 


Add the paneer cubes now. I tend to just shallow fry the paneer just because I like the texture that way but you can add fresh paneer. Just add some water to thin it out to the consistency of the gravy as you like it. Let the mix simmer a little in  low flame to incorporate everything together and for the paneer to absorb all the flavors together. Stir it gently to not break the paneer.
                         

Add in fresh cream or heavy cream and give it a mix with light hands. The paneer is really soft to the touch and might break off easily.


Slit a piece of ginger into juliennes and also slit the green chillies. Heat up 1 tsp of butter and sautee the ginger and green chillies for just a minute until they soften up and add this into the gravy. Since we add the green chillies now, adjust the quantity of red chilly powder in the gravy to suit your taste. This gravy tends to be on the sweeter side generally with minimal heat.


Serve piping hot with chapatis or rotis or even any rice varieties. It goes great with some peas pulao or jeera pulao!!

Tips

  • The original recipe for paneer makhni involves cooking tomatoes, making a puree. The sauce is a perfect substitute. You can alternatively use tomato puree instead or even diluted tomato paste. 
  • Substitute mixed veggies like carrots, beans, potatoes, cauliflower and peas for the paneer and make it a vegetable makhni!
  • Want to Make a healthy low fat version? Substitute oil in place of butter and milk for cream and you’re all set!




Sunday, March 15, 2015

WHITE SANDWICH BREAD

White Sandwich Bread Recipe


I have loved baking with yeast over the years. Especially since I started making fresh pav (dinner rolls) for my pav bhaji! Once I perfected that I knew I had to have a go to recipe for sandwich bread too. The fact that my husband does not eat store bought bread( long story, now is not the time I assure you) is a huge motivation. And trust me, freshly baked sandwich bread is way tastier than any store bought bread. Not if you’re buying your bread from a bakery that makes fresh bread everyday! But most of us (not so lucky) folks do end up buying bread from a grocery store, and this recipe just beats everything hands down!

I found this recipe from annie’s eats and took some time to get it absolutely right! The taste would always turn out fine, but the texture took me a while to perfect! Then I figured out that kneading the dough was the key to getting that perfect texture, a nice crunchy crust with a soft interior. This bread is not too sweet, and not entirely savory so its perfect for both sweet and savory sandwiches!


Ingredients


Bread Flour
3.5 cups
Yeast (Rapid Rise yeast)
1 packet i.e. 2 and ¼ tsp
Butter
2 tsp
Honey
3 tbsp
Salt
1 tsp
Water
1/3 cup (110 F)
Milk (whole or 2%)
1 cup (110 F)


Yeast is that beautiful microorganism that is responsible for processing carbohydrates to release carbon dioxide. This is the reason for those beautiful holes you see in breads that are formed when the gas is released in the bread dough while baking. Yeast is activated when dunked in warm (not hot, around 110F) water along with a little food(sugar or honey). When using active dry yeast, it needs to be activated before you put it in the contents of the recipe, just to give it a head start to do its magic. Rapid rise yeast can be added as is to the flour while using lukewarm liquids to make the dough. Though I have used rapid rise, I still gave it some time to activate. But if using rapid rise yeast, better to mix the yeast with the dry ingredients and ensure that the liquids to be added are lukewarm (around 110 F).


Method


Mix the flour with the salt and set aside.

Take the yeast in a bowl and add the honey and water and give it a whisk. Set aside for 10 minutes. If the quality of yeast is really good, then you will start to see bubbles form on the surface of the yeast solution. Melt the butter into the milk. Be careful to keep the liquids warm and not hot as this would kill the yeast.


Mix the yeast solution and milk into the flour and form dough. Once the dough is formed, it will be extremely sticky. Kneading is the process of strengthening the dough to form the final texture of the bread. It will enhance the formation of glutens which will render the bread its unique soft structure.

Kneading the dough


On a lightly floured surface, take the dough and stretch it by pulling on the ends of the dough. Fold the dough back over and press it . Now turn the dough to a right angle and repeat the process. Keep repeating this until the dough turns from a sticky mass to a shiny and elastic dough. I have started using my Kitchenaid Stand Mixer to do this job for me as it saves a lot of the time and effort! If using a stand mixer, set the mixer in the lowest speed with the dough hook attachment, to mix the dough and then crank up the speed to about 2 or 4 and let it run for about 10 minutes. The dough will start to twist around the dough hook. But from the surface it will look smooth and elastic which is when the dough has been well knead. More you knead the dough, softer the final bread will be. Take out the dough from the mixer, form a ball with it. To make the ball smooth, stretch the dough to form a semi circle and pull all the ends to the bottom so that the top is smooth. Scrunch it up so that all the ends are at the bottom and pinch it together. Don’t worry, the dough will rise and the imperfections go away once the dough is risen.


Let the dough rise until its double in size. Just rub the surface of the bowl with some oil or butter and coat the surface of the dough too. This prevents the dough from getting dry and also ensures it doesn’t stick to the surface of the bowl for easy removal. Cover it with plastic wrap and set it in a warm place. I usually keep it in my oven without it being turned on. You can also keep the oven light on, sometimes the bulbs heat is good for the yeast! The time it takes to rise varies. Most of the time an hour should do it, but if the yeast is slightly lazy(Hey, we can be lazy so why shouldn’t yeast be??) it may take longer or even lesser time (if its really active). Give it time to rise to double in size as this is a really important step. If the dough hasn’t risen after a long time (greater than 2 hours) then the yeast isn’t doing the job and the bread will be hard and dense. Better start over.


Once the dough is all pillowy and risen, punch the dough to let the air out. Then knead it with your hands for about 2 minutes and shape it in the form of a loaf. Set this in a greased loaf pan and let the dough rise for the second time. This time let it rise for 30-45 minutes, till you can see the dough rise above the loaf pan. This time do not cover the dough with plastic wrap as it tends to stick.


Place the loaf pan in a pre heated 350 F oven on the top rack. Ensure that the top surface of the dough is well away from the heating element in the oven as it tends to rise just a little bit more while baking. Also in the bottom rack set another loaf pan with 2 cups of boiling water. This steam will ensure the dough doesn’t dry out. Let it bake for 40-50 minutes. Every oven is different, so baking time varies. I take the bread out after 47 minutes.


The top will feel hard and crusty, it will be nice and brown. The bottom should sound hollow when you tap it. It will be considerably softer and spongier than the top. Set it in a cooling rack and let it cool down for atleast 5-10 minutes. Once it is cooled down slice it up and enjoy it whichever way you like!


Freshly baked bread tastes wonderful with just a dab of butter! I had mine with some butter and jam! Guess who else loved it?My little one! So satisfying when you can make something like this for family..


Tips

  • Sometimes, cold weather can be a big dampener for yeast. In that case, you can add slightly hot water(slightly only) to the yeast. 
  • The original recipe calls for 2 tsp of salt, I added 1 tsp because i wanted to make sweet sandwiches out of the bread too with butter and jam, but you can always add 2 tsp.
  • This bread is freshly made, and lasts only a few days (lesser than store bought bread).
  • Do not throw away stale bread, you can make croutons or bread crumbs with it.
  • Store at room temperature only, it has to be covered well to prevent it from drying out.
  • Use a sharp, serrated bread knife to cut the bread, do so only after the bread has cooled down considerably. 
  • Slice it as and when you need the bread and keep the open side of the bread away from air, it tends to dry up otherwise.

Wednesday, March 11, 2015

Strawberry Jam


Strawberry Jam recipe


One of the things I am grateful for staying the US is that you get fresh sweet strawberries. They are so colorful and I always buy a big box when I visit the grocery store when they are in season. The husband hardly eats store bought bread so I thought it would be nice to have this pairing with my homemade bread. This recipe is incredibly simple, needs just 3 ingredients and delicious!

I know most of us end up buying jam in stores so making this at home isn’t really necessary but this is a great recipe to make just when you want a small quantity of fresh homemade jam that’s free of preservatives and also you can make it organic or with reduced sugar too. Here’s what you will need.

Ingredients


Strawberries
2 lbs or about 5 cups of chopped berries
Sugar
2.5 cups
Lemon Juice
Juice of one lemon


Method


Wash the strawberries and chop them into quarters. Mine were pretty large berries so I quartered them. If you prefer a chunkier jam you can halve them instead.


Add the lemon juice and about 1 tsp of sugar and mix it into the berries. Let it sit for 10 minutes.Once that’s done mash the berries a little with a potato masher. Then add the sugar and strawberries into a big pot and switch on the stove.


The strawberries will ooze out more juice along the way and the mixture will become runny. Keep cooking it for about 20-25 minutes.


It will star to congeal together and become gel like. When the mixture is thickened nicely, you will be able to see a lot of bubbles on the surface. It will be runnier than finished jam but don’t overcook it. It will thicken more while it cools down. If overcooked the sugar will crystallize and the finished product will not be nice as we want the jam to remain gooey and moist.

Switch off the stove and transfer it into a jar to completely cool. It is better to use glass jars, especially while storing it for a long time. Sterilise the jars by boiling them in hot water before storing the jam. Unless you are absolutely sure that the jam will be used up soon , it is always better to store them in sterilized jam jars.


Tips

  •  Its better to taste the berries before you decide the amount of sugar you add. When in season, they are naturally very sweet and do not need as much sugar.
  • Brown sugar can also be used instead of white sugar, as it is healthier.


Saturday, March 7, 2015

Homemade Malai Paneer

How to make Malai Paneer at home


Who doesnt love paneer. Well my husband doesn't (Weird right?). I am sure he must be one of a minority! I remember my first time tasting paneer, it was at this restaurant when I was 6 and I remember being completely blown away by the flavor back then ( which kid doesn't love cheese). Being a big paneer fan I have it often as a side dish for chapati or even with dosa.

Buying paneer abroad is slightly expensive and its not often you can find fresh paneer every time you need it, which in my case is pretty often! Store bought paneer often has certain additives along with binders like flour.  Making it at home is not only cheaper, but a sure shot way to know that its healthy and has no added preservatives.  

I have lost count on my attempts to make paneer at home because there were just so many unsuccessful attempts. I just took the easier route buying it at the store (where thankfully I got it every time I wanted it!) Then I promised myself…one last time and that was it! Luckily it worked….and now I AM NEVER GOING BACK! All we need is some milk, some cream, something to curdle it and a cheese cloth to collect the cheese and an apparatus to set the paneer. I generally make a good huge batch and use it for a long time, hence the quantity. When making it at home, you can always size down the quantity of milk and ensure that you reduce whatever you use to curdle it.

Oh and did I mention? The toughest part of this recipe is the WAITING!!

Ingredients


Whole Milk   1 gallon
Heavy Cream  1.5 cups (30-45% fat content)
Vinegar   3/4 cup to 1 cup

Notes: You can always make paneer with 2% or even 1% milk. The result will definitely yield a lot less paneer , because the milk has been stripped of its fat content. 

Method


Take a wide bottomed nonstick (for easy cleaning) pan and bring the milk to a boil on medium heat. Once it comes to a boil keep stirring it for about 2 minutes. The cream will start floating towards the top.


Add the vinegar now. I have used vinegar but you can use lemon juice and buttermilk too. The quantity you add will vary given the quality of milk etc so I cant give the exact amount. 


Add the vinegar slowly little by little at a time. Give the milk a stir, you will see the curdling process start almost immediately. Keep going until you see the liquid separate completely from the fats. The liquid will seem green in color or pale white (since we are using heavy cream) which just means that the curdling process is complete. 


Switch off the heat now. Some people recommend switching it off earlier, in fact to even even add ice cubes to stop the cooking process to ensure the paneer is soft. However I like my paneer a little firm, to hold its shape so I stop the heat only after the separation has happened. Strain the cheese onto a cheese cloth. 


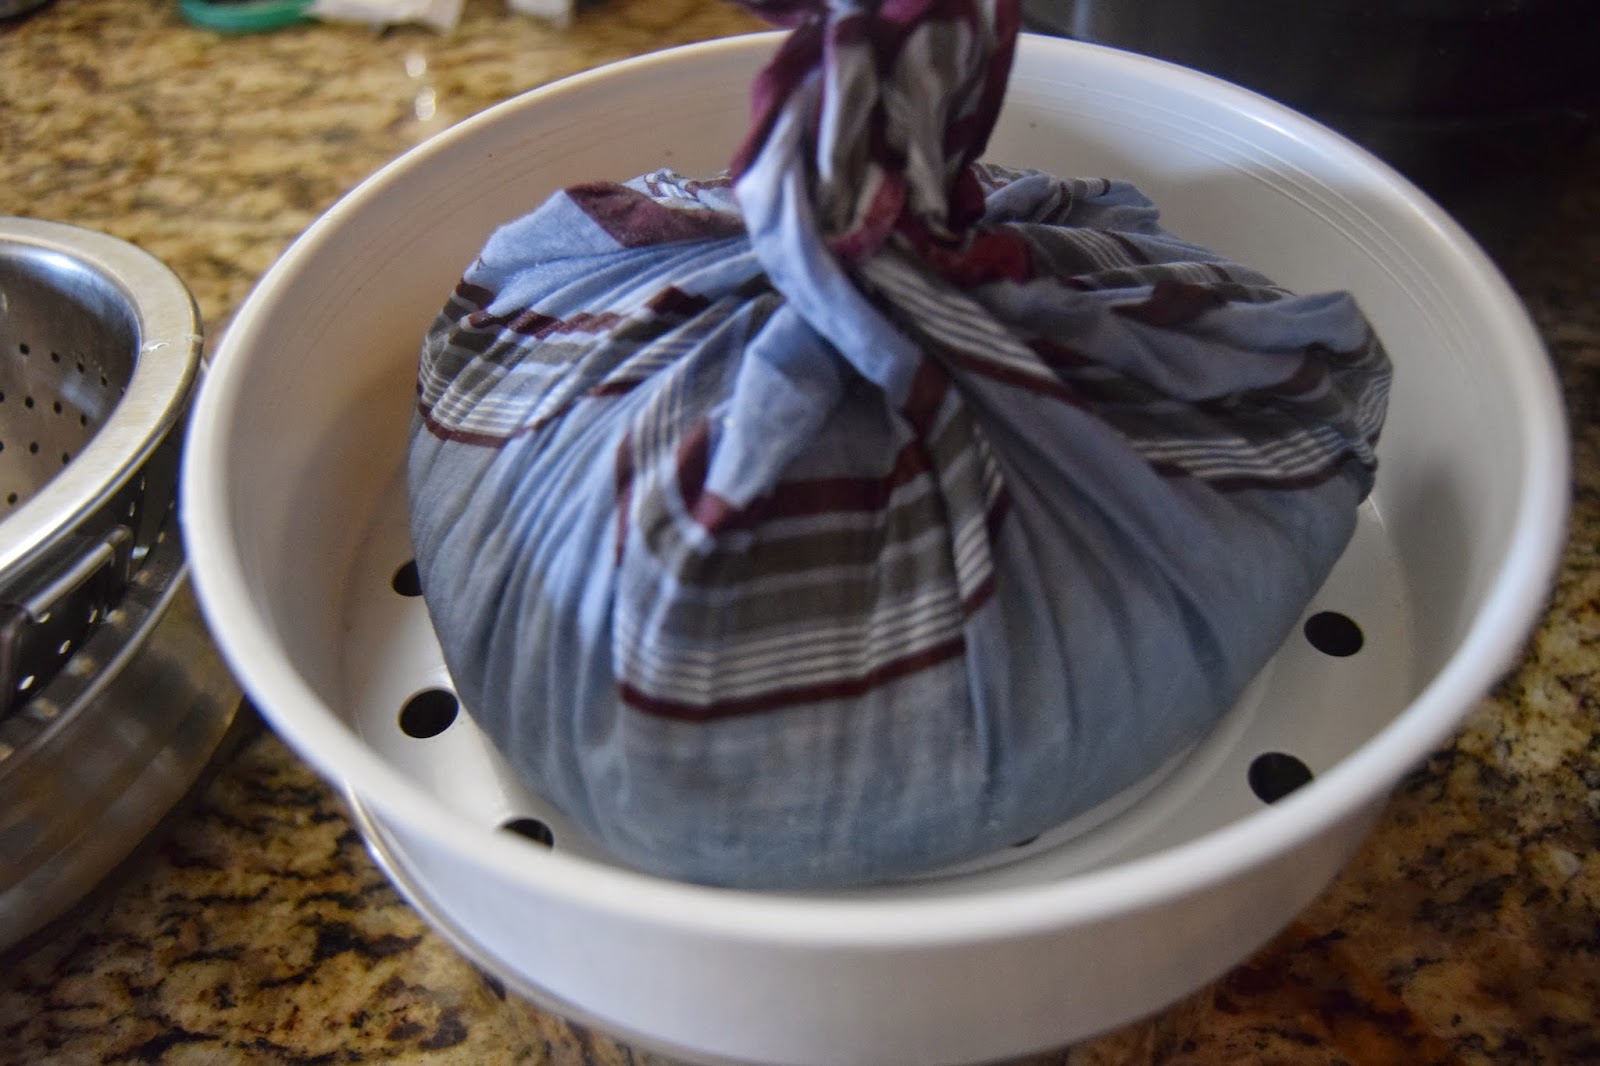
Initially I used to pour the entire liquid through a sieve and collect the cheese in the cheese cloth. I dont have a cheese cloth so used a clean handkerchief instead. Now there's too much liquid so I end up taking the cheese out with a slotted spoon to make the drying process easier.


Now comes the important part. To Set the paneer well, you need to wrap the cheese tightly (you can knot the cloth too, but mine was a small handkerchief) so i just folded it over the paneer to squeeze out the remaining water and place a heavy weight distributed uniformly to get a good shape. I used my mortar and pestle in addition to a vessel filled with water.


Wait for atleast 3 hours.It took me all my patience to not keep peeking in every few minutes so I left it undisturbed. After that it still dint seem firm enough so I set the apparatus in the fridge and checked it after a few hours. This is what it looked like.


Storing it is relatively simple. It can be dunked into any subji as is. If not, it stays fresh in the fridge for unto 4 days, provided its kept immersed in water. I generally don't use the paneer right away, also this is a pretty big batch. I cube it, shallow fry it and pack them in snack bags and throw them away in the freezer. They remain good, even for a few months although I doubt it would last that long. 


Notes


  1. Dunk frozen paneer in some hot water before you use it in any subji so that it would be soft
  2. You can always flavor the paneer. People mostly complain that its bland does not have any taste of its own. Adding salt just after the milk is curdled is good, also you can add pepper, or fenugreek leaves(dried) to amp up the flavor.
  3. Please do not discard the whey water. It is highly nutritious, it has a lot of protein content. You can always add it to soups, chapati dough(I always do it, it makes the softest chapatis) etc.
  4. You can use a lot of things to curdle the milk like lemon juice, whey water left over from the previous batch of paneer or even beaten buttermilk. For me, vinegar has always worked the best so i tend to lean more towards it.
  5. Heavy cream is optional, you can omit it. I feel that the end result is softer and richer (it is for malai paneer after all) but paneer made from milk works just as well. The yield is a lot higher when using heavy cream.
  6. To get firm, spongy yet soft paneer ensure that you heat the milk really well, let it stay at that temperature for 5 minutes and then add the vinegar.